Thứ Tư, 30 tháng 1, 2013

Hello!

Would you guess it is already the end of January?!!?? 

Wow!

Well, I've not had much to write, but I can finally report
I have my sewing machine back!!


Yes, Pfaff came through and replaced my less than one-year old machine with a new one.  The one I had kept seizing up due to a bad bearing or so said the local repair man.
Thank you to Pfaff!

 Needless to say, my sewing time was pretty much non-existent ... 

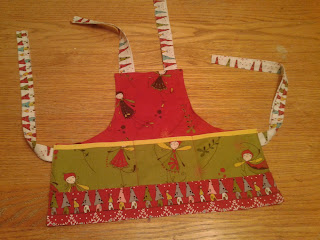
I did accomplish a little apron for a darling little artist ...


This budding little artist is Ruby.  She turned two a couple of weeks ago and her mom,
a new co-worker I adore, got her the easel and the works but couldn't find her baby girl
an apron ... so, me being me, I offered to make her one.
Would you know, it turned out just right!  
Here's a close-up of the reversible apron,

The back side is just the same, but the pocket is white instead of green ...
you'll have to use your imagination as I don't have a photo readily available.
The apron is 12 inches top to bottom ... just right for Little Miss Ruby.
My own design because Miss Ruby may be two but is a sweet petite and wears
18 MO size clothes for which I couldn't find a ready-made pattern on-line
in one night, so I improvised and used just the fabric I had available
in my stash ... I'd say it was a winner :)
Miss Ruby thought so too (so'd her mom which counts even more!!)

As for other sewing room business, I celebrated the return
of my sewing machine by spending my daughter-free weekend in my
sewing room with my full collection of Harry Potter movies and watched
every one of them while I created by Hug-n-Kisses piece for
the up coming hop.  You know ... Cheerleader Jane of
Jane's Fabrics and Quilts is leading us through this hop:
No sneak peeks!  Have to wait until the 15th :)

After that we get to be led by the cheers of Marlene of
Stitchin by the Lake for the Its All About Me Hop ...

I'm so excited for these hops!!

Of course, to tide me over until I join in on those hops, I get to
enjoy the Dare to Dresden Hop that Cheerleader Christine from

Click on the link above and you'll be taken directly
to the schedule of this daring blog hop.


Join me, won't you, in being inspired by all of our
creative neighbors?

I send out a big shout out to Madame Samm of
Sew We Quilt for all of her master cheerleading skills
and her middle of the night ideas to keep us all
encouraged and challenged.  Thank you!

On an un-quilty note, I have to share that
I'm really, really enjoying my new legal assistant
position at the law firm I joined in November and
am grateful every day for the steps along the way
that have led me to where I am now.  

What a wonderful group of people I get to work with,
I'm challenged with learning new things and comfortable
in the knowledge that I'm using skills I long forgot I had.

But what's even better, is knowing I belong to this
marvelous group of neighbors in the blogihood for whom
I am extremely grateful for inspiring me and supporting me
every time I log on to visit with you.

Bless you and I look forward to visiting with you soon,

Happy hugs and warm hearted wishes,


Thứ Bảy, 26 tháng 1, 2013

Floss Polish Rainbow Necklace


Hello all! In this post I will talk to you about another use of your nail polishes - to make jewelry! On a semi-related note, I do hope you all know how important it is to floss your teeth. After all, your smile is your best asset. I used to not be motivated to floss. I'd always think of it as a drag, but now that I've realized that regular flossing gets me a gorgeous necklace, I am flossing all the time haha!

So let me explain what you need. When you use up all the floss, open the little box in which it came (brand is not important, I believe all are the same). Inside you will see that the floss was wrapped over two little plastic rings. Short and simple, you paint these rings with your favorite polish colors and you've got a necklace. The plastic rings are wide enough to go over any chain.
A few short notes - for the nail polishes you will use, I'd suggest making sure these are not very slow drying polishes, and make sure they are one-coaters, because if it's a very watery polish it will take you FOREVER until you are done.
This is how I paint the plastic rings:
step 1 - Roll a piece of paper and slide it through the ring, so that the ring stays put and cannot move, then I paint just the outer side. When leaving this to dry, I usually secure the paper on the edge of a table, because if you place it down to dry, it will get smudged. You can also place it upwards in a short glass.
step 2 - Once this is completely dry I remove the paper roll and then paint the inside of the ring. In my opinion, if you do not paint the inside you will be able to see the white while wearing the necklace/bracelet/whatever, so I'd suggest that you do not skip this step. As I'm painting the inside, I wear latex gloves just to make sure I dont paint my fingers by accident.
step 3 - After painting the inside (before letting it dry) place the ring downwards (just like it's laying in my palm in one of the previous photos, and then paint the edge of the ring that's facing up. Let it dry.
step 4 - After the edge is dry, flip the plastic ring and paint the bottom edge (the bottom edge is now facing up), and let it dry...And you're done!

There's a lot of let-it-dry's here, so I hope you guys get why it's important to use one-coaters. Anyways, it's easy as cake, and I hope you guys try it out, when I first made this necklace I had only two colors (yellow and red), and I loved wearing the necklace as well, then I just started adding colors...you can make a ton of combinations, as you can see on the photos in this post.
Hope you guys try it out and have fun with it...I will continue to add rings, I've got plenty of colors to go on. You can also add stamping or glitter polish on the rings as well.
Anyway, in this post I just wanted to share with you guys what I ALSO use my nail polishes for, I hope you enjoyed it. Remember, keep flossing! I know now I never miss to floss after a meal (I'm trying to use up my floss faster).
Just to sort of prepare you,  it will take you some time to use up a box of floss, depending on how many floss is in it, but in my experience, at least a month.

See you soon in a usual post where the nail polish will be on my nails hehe. Love, Jelena

Thứ Ba, 15 tháng 1, 2013

Upgrading The Candy Bar

Hey everyone! So this look is very simple - 3 coats of Maybelline's 'Candy Bar' (this is from the collection before the new bottles), then some glitter from Essence, this polish is called 'Circus Confetti', and it's part of their 'special effect!' line...and to top it all off, one layer of Essence's Studio Nails top sealer. The Maybelline polish requires at least 2 coats, so I'm not too happy with it, but the color is amazing (there's more photos in my previous post). The glitter is a fun shade, the combination of colors is amazing. As far as the top coat goes, it's the best one I've ever tried - and it makes your manicure last for days -this is a must have product. There is a photo of the polishes I used at the bottom of the post. Hope you guys are having a great time, it's been snowing like crazy here.
kisses, Jelena

Chủ Nhật, 13 tháng 1, 2013

Candy Bar Is A Great Name Choice

Hello lovely people! Here is a swatch of a polish from the old Maybelline collection. It's number 26 called 'Candy Bar'. In the bottle it didnt look very appealing to me, but on my nails it's just heaven. It's a light gentle pink, it made my hands look so elegant. The down side is - this polish is not a one coater. On these photos I am wearing 3 coats, but if you're very careful, you can wear just 2 coats. Because of this it takes forever to dry but I dont care about any of that because the shade is just so lovely. You can still find these in some stores, the old collection is now on sale for 1 euro - how awesome is that! I've been buying these like crazy!

Thứ Hai, 7 tháng 1, 2013

Croatian Winter vs. Hand Creams

Hey girls! I thought I might quickly share my favorite hand creams, since I used to have such a hard time finding products I was happy with, and no one will notice your pretty nails if your hands are dry. My hands get very dry during winter, especially when it's snowing outside. So the first hand cream I will talk about is by Cera di Cupra (the photo above). It's an italian brand, and this hand cream is super cheap, and honestly I didnt expect much from it...but this ended up being better than most of my very expensive creams. Makes your skin instantly soft, doesnt rinse out easily, doesnt make your hands oily - trust me, you NEED to buy this. I only noticed this brand this year in our stores, so I dont know much about them or their products, and this is the first of their products that I've tried out, but I will be picking up a few other things as well. I am seriously nuts about this hand cream.
The next hand cream is a croatian product that I fell in love with (picture above). It's made by PIP, a croatian company that makes...mostly honey? Like the italian hand cream (by Cera di Cupra), this one also contains beeswax (which apparently my skin loves). I love the cute packaging. I tried out this cream because this brand makes awesome honey, this is the first product I tried from then that isnt meant to be eaten. The awesome things I've said about the italian hand cream can be said for this one as well - both are awesome and I cannot pick a favorite - this will work wonders as well. The italian one is a bit cheaper, so maybe that's a plus. This cream can be bought only in your local pharmacy, so if you have a very dry skin or serious problems with your skin, this is a better pick for you.
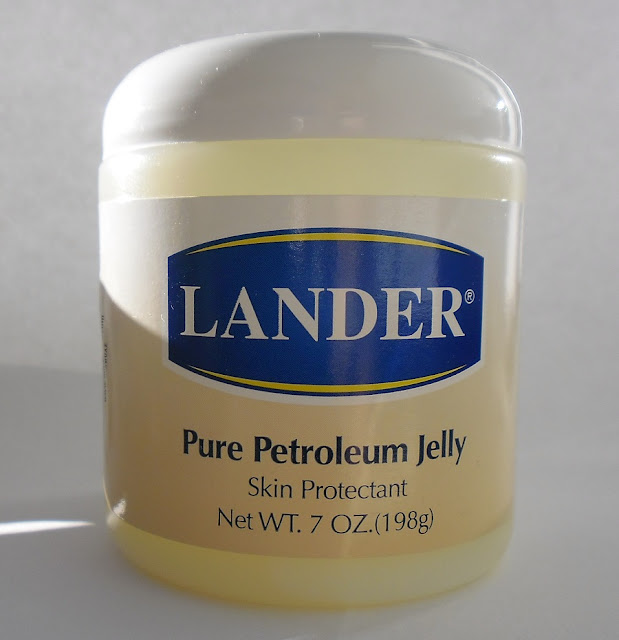
The last product I will mention helps my skin when it seems it's beyond help - It's Pure Petroleum Jelly by Lander. Now, this isnt a hand cream - it's too oily to use when you're actually using your hands. What I do is, I put this all over my hands, then I wear my cotton gloves and then I just go to bed, or go watch a movie- when I take the gloves off, my skin is just so incredibly soft. During the winter I go to sleep like this at least twice a week - and I no longer have the problems with dry skin as I used to. I hope you guys enjoyed this post, have any other croatian girls tried out these products, what are your opinions? :) See you in the next post, where I'll be talking about nail polish as usual ;)

Thứ Bảy, 5 tháng 1, 2013

Hopping In Your Words ...


Linda at Buzzing and Bumbling has been
busy working to get us ready for this hop--it starts Monday!
Check out the whole schedule

I may not be participating but I'll be hopping
to be inspired by all those who are!

Best wishes ~


Related Posts Plugin for WordPress, Blogger...